Monday, September 5, 2016

What happens if there is no EveryTrail integration:


  Simply put, you only lose the convenience to search and download Everytrail trips directly from the application. The rest 95% functionalities of GPS Hiker work well without impact.


  When GPS Hiker was created a few years ago, EveryTrail.com is the best free platform to provide trips created by others and  provided the integration to 3rd party apps (like GPS Hiker) to allow users to search, download trips from the site and upload trips to the site, directly from the app. To do so, you need EveryTrail account. Unfortunately, EveryTrail.com is acquired by AllTrails.com on 8/2/2106 and the free integration is no longer valid as AllTrails.com requires paid annual fee and provides no integration for 3rd party apps. . If you have uploaded trips to EveryTrail before, you can go to the url below to download them and send them to GPS Hiker if necessary (please download trips asap as I am not sure when it will expire):
  However, EveryTrail account is not required to use GPS Hiker and nor is EveryTrail the only source of free trips available on the internet. Alternatively, you can search and download trips from the web (for example, connect.garmin.com which also has vast amount of trips and free registration), send the gpx file (trip) to your mail, and use GPS Hiker to open the mail attachment on the phone to save trip into the app. After the gpx file (trip) is saved into GPS Hiker, the rest functionalities (recording trips, import trip, offline maps, trip analysis, elevation graph, follow trip, ....) are the same as before. Once you recorded the trip, you can upload the gpx file to any web site (for example,connect.garmin.com) which provides the service at your choice.

Below are examples I will show you how to do search trip and send it to GPS Hiker:

1.  Get a free registration at connect.garmin.com and go to the url below:


2. Enter your destination at the box for "Starting Near" and search.


3. Click on the trip at your choice. Dog Lake is our example.
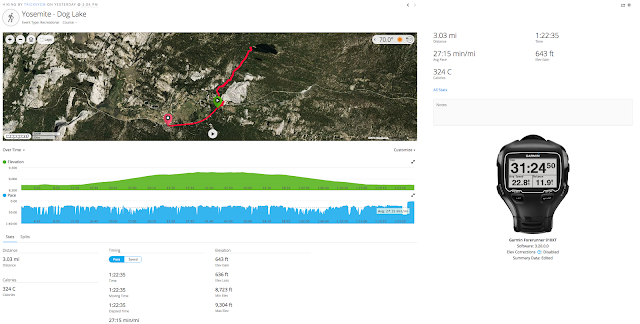


4. Click at the setting button on the top right corner and select "Export to GPX".


5. Once the file is exported at  your own naming. Send the file as attachment to your own mail. From you iPhone, open the mail attachment via GPS Hiker and the file will be saved under Saved Trips. Import the trip as reference trip during the trip which allows you to follow the trip and know how long and far you still need to go for the trip.


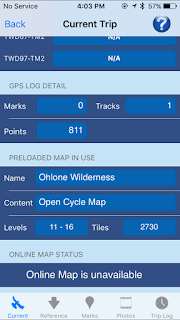
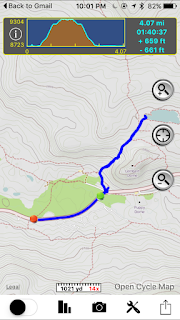
Below are screenshots of some functionalities provided by GPS Hiker not related to EveryTrail integration. GPS Hiker is a free application and not intended to make profile. This is my feedback to the hiking community as an avid hiker. Rest assured, I will keep improving the application for better functionalities. Your feedback is important to it. Thanks!

1. Import Trip


2. Record and follow trip


3. Track information


3. Add Mark


4. Current Trip Information


5. Reference Trip Information


6. Photo Information


7. Trip Analysis


8. Altitude Profile


9. Save Trip


10. Saved Trip


Sunday, March 27, 2016

無法登入, 查詢, 下載或上傳行程

登山客中查詢,下載或上傳行程都是利用everytrail.com的免費平台, 如果everytrail.com斷線就會產生無法登入, 查詢, 下載或上傳行程的問題. 因為everytrail.com多年前已被trip advisor收購, 所以目前並沒有投入太多資源維護此平台, 因而常有斷線情況發生, 斷線發生後通常一週內就會修護. 由於登山客與everytrail.com並沒有付費關係, 只是單純的提供功能連結, 所以無法修護其網站斷線情況, 或更改帳號資訊. 若有網站斷線, 只能等它自己復線.

如果在登山客中遇到無法登入或無法查詢, 下載或上傳行程的問題, 可以先確認自身網路是否有問題, 再進入everytrail.com網站看看網站是否有問題. 如果是everytrail.com網站問題, 請耐心稍候幾天再試試.

既然everytrail.com系統如此不穩定, 登山客為何還繼續用它? 就免費平台而言, everytrail.com仍是資料最豐富, 提供功能最強的網站, 而且目前也還沒找到適合的替換方案, 歡迎大家提供替換方案的意見. 謝謝!

Monday, March 30, 2015

EveryTrail上的行程為何無法顯示軌跡及下載GPX檔案

如果登山客使用上有無法下載EveryTrail GPX檔案或顯示GPX軌跡的問題, 這是因為EveryTrail.com本身有時有無法將軌跡檔與其遠端伺服器的GPX檔案同步問題(已回報給EvertTrail.com), 登山客使用此遠端伺服器的GPX檔案以顯示GPX軌跡. 暫時的解決方法: 如果你有EveryTrail帳號, 可在PC上到其網站下載GPX檔案(如此遠端伺服器的GPX檔案即可同步), 再到登山客重新下載GPX檔案或顯示GPX軌跡即可.

Thursday, January 16, 2014

FAQ

1. How do I create an offline map?

Please check http://gpshiker4ios.blogspot.com/2013/12/how-to-create-offline-map.html

2. The compass heading is not working.

Go to Settings -> Privacy -> Location Services -> System Services and make sure Compass Calibration is enabled.

Applies to iOS 7.0.

3. GPS is not working.

Go to Settings -> Privacy -> Location Services and make sure both Location Services and GPS Hiker are both enabled.


Friday, December 27, 2013

How to create an offline map

In GPS Hiker, you can create an offline map to be used in wilderness when there is no network available. An offline map is an overlay displayed on top of the main map.

1. Go to the Offline Maps screen and click on the top left "Add" button to create new offline map.


 2. On the "New Offline Map" screen, you need to input the name of the map,  the origin of the map data and its bound. The origin of the map is the data source of the map. It can be either online map tile service or an image file you store locally. The map data of online map tile services mostly comes from www.openstreetmap.org. Map bound defines the coverage of the map and consists of two latitude lines (north and south) and two longitude lines (east and west).


3. Go to the "Name" field and enter the name of the map. Name can be duplicate.


4. Go to the "Origin" field and select the type of map data origin. It can be either online map tile service or local image file. If "Map Tile Service" is selected, you need to select a service providers as well. If "Local Image File" is selected, you can select an previously saved map image (need to use Mercator projection) to be used as offline map.


5. Map bound is defined by a rectangle consisting of two latitude lines on the north and south ends and two longitude lines on the west and east ends. For example, 24N (northern latitude line), 23N (southern latitude line), 110E (western longitude line) and 108E (eastern longitude line).


6. Map bound is specified in the "Bound Coordinate" section. You can manually enter the coordinates    for latitude and longitude lines. For your convenience, you can also either select a saved trip and use its trip bound to define the map big enough to cover the trip, or click on the map to define its bound.


7. You can manually enter coordinates for map bound. 


8. Or you can select a trip from your locally saved trips and use its trip bound to define a map big enough to cover the trip.


8a. Just select a trip from the drop down list and click on the "Use" button.


8b. It may take a while to process the data after clicking on the "Use" button. Once it's done, the coordinate fields would be automatically populated via the coordinates of the trip bound.


9. You can also define map bound by specifying two diagonal corner points of the rectangle on the online map. Click on "Create Bound On Map" button to do so.


9a. Pan and zoom the map to the area where you want to define the map bound for the new offline map.


9b. Long press on the map to specify the first corner point of the map coverage. Click on the "Undo" button if you make a mistake.


9c. Long press on the map to specify the second diagonal corner point and the map coverage is defined by the rectangle shown on the map. The solid rectangle is the map bound specified by you and the bigger outlined rectangle is the area actually would be downloaded. Click on the "Done" button for completion.


10. Once you finish inputing map name, origin and bound, click on the "Save" button to save the new offline map and it will go back to the "Offline Maps" screen. Please note that you need to download the map tiles first before using the new offline map.


11. Locate your newly created offline map on the "Offline Maps" screen and click on it.


11a. Click on the "Download" button to download the map tiles from the service provider. Make sure you have network service before doing so. Wi-fi connection is recommended to save network fee.


11b. The download process can be slow as the map tile service is free and has bandwidth limitation.


11c. After the download is complete, click on the "Add To Main Map" button to use the offline map. If a  map is downloaded, you can add it to the map directly. Or you can download the map again to get the new map data.


11d. The offline map will be displayed as an overlay on top of the main map. To remove the offline map from the main map, go to the configuration screen and click on the red "Offline Map" button.


Thursday, October 11, 2012

如何搜尋中文行程

由於EveryTrail.com目前尚未支援中文關鍵字搜尋, 故須利用位置訊息(附近行程)才能搜尋中文行程. 利用附近行程搜尋, 須指定搜尋中心及範圍半徑. 搜尋中心可長按主地圖位置指定或搜尋住址(地標)指定, 範圍半徑則在進階搜尋中設定(若長按主地圖位置, 範圍半徑自動設定為螢幕地圖範圍). 附近行程搜尋會找出行程位置在搜尋範圍內的行程. 行程位置為行程範圍的中心點(非行程起點). 設定範圍半徑須考慮行程長度 , 長度大的行程搜尋半徑最好設大點, 才能找到所要行程. 搜尋行程最佳方法為將主地圖調成欲搜尋行程範圍, 長按主地圖中心以搜尋附近行程.


以七星山為例, 大多為單日行程, 搜尋中心為七星山, 搜尋半徑可設定為10km. 


以大霸尖山為例, 大多為多日行程, 搜尋中心為大霸尖山, 搜尋半徑可設定為30km.